Search This Blog

Friday, September 9, 2022

2022 Colorado Elk Odyssey - C1 EP 1

Our story begins in the dark morning hours as the four hunters, including two compound bow and 3 stickbow shooters, meet at BWI airport en-route to Denver Colorado.  Two of the group, Dave and Jeff, started out as just a couple local Maryland guys who read my first DIY elk hunting adventure online and were inspired to do it themselves many years ago.  We eventually met them out in the elk woods and we have become close friends and hunting buds ever since. Neil, joined my brother and I the previous year in the San Juans.   His hunting mentor and friend Dave was started on the hunting journey by my brother Chris decades ago.  Now the five of us are all united at the gate after going through security.  


                         Here Jeff, Neil, and Dave wait for baggage at the Denver airport.

The area we are headed for was new to my brother and I, but Jeff and Dave had some good encounters there several years ago.  Everyone was excited and apprehensive to discover if the change in area would bring us more luck or less pressure then we had experienced the previous year. 

We would again hike into the hunting area carrying everything we would need for a week in the backcountry far from the vehicles. The hike in would sure be a little easier than the extremely steep 3 miles and 27 switch back "Hill of Death" just to reach the hunting plateau we were accustomed to in the past.  The trail would still be challenging with a few similarly steep sections near the top of the high saddle onto the area.  I was a little anxious to see if my stubborn brother Chris had remembered the lessons of the past and packed light.  After all, he was one year shy of his 60th birthday this year!  I was no younger either but I made darn sure to keep my total carry under 50 pounds. 

At the end of the flight we landed and secured two vehicles.  One was a full sized suburban and the other a 4 door ram pickup.  We headed to walmart to get some butane for the stoves and to buy Jeff and Dave's tags!  They wanted to wait until they got there, and of course the computer was down and we had to drive out of Denver to another walmart a hour down the highway.  

While we were waiting for the pair in the parking lot, my brother decides to change into his "field clothes".  Quite amusing the rest of us, and the walmart shoppers, he sported a wonderfully mismatched camo ensemble complete with a sleeveless woodland DBU shirt that looked like he had just cut them with a dull bent steak knife before he left.  All I could think of was Burt Reynolds in Deliverance crossed with Larry the Cable Guy!  


I was fairly sure the homeless guy at the gas station when we made our first stop for fuel was coming over to get him out of "his turf" until he reached the suburban and opened the door.


In any event, we made it to the trail head after several hours of driving and stuffing down junk food.  Yes, we were headed from sea level up to 11.5K in one day...again.  I was a little concerned when we parked along the road at the trail head when I counted about 10 vehicles lining both sides of the road.  I reassured myself though, it was a Friday before a long Holiday weekend and the trailhead also served a very popular hiking trail and vista.   We were in it for the long haul! This year seemed special.  We had 5 backs to haul meat and I felt our chances were good.  One thing was certain, we were going to hit it HARD....


Wednesday, June 8, 2022

Burying the Dutch Oven - A Bowhunting Camp Tradition

There is nothing like coming back to deer camp after dark in the evening, tired and haggard from a long day of hunting, and not having to worry about cooking a hot meal.  The dutch oven is a primitive version of crock pot cooking with the benefits that everything is sealed and safe. It is a delicious food time capsule delivering a piping hot cooked meal on demand. 

I stumbled across this method of camp cooking when I was reading some of John Schulz's stories about the legendary Howard Hill.  Apparently, some fans heard Howard was camped in a certain area and made themselves at home in his camp waiting for his return.  They decided to help him out by building a roaring fire.  The problem was that Howard had a nice venison roast buried under the campfire in his dutch oven.  When he saw the fire as he approached camp, he ran out like a wild-man to the shock of his "guests" cursing and kicking burning logs all over the place trying to rescue his supper.  He was too late and it was a charcoal softball.  He was not too happy with those particular "fans" after he had to eat cold peanut butter sandwiches for supper.  


Burying the dutch has now become my traditional hunting camp supper because of the quality and convenience of the meal.  After a quick breakfast I am out and hunting in the magical morning hours.  I'll typically return about midday and start a campfire and begin preparations.  I will have already had my camp non-cooking camp mates dig a hole that is at least 3 inches wider and several feet deeper than the dimensions of the dutch oven adjacent to my campfire.   


Once there are some good coals going, shovel a bunch and fill the hole. Then continue to burn some more wood in the hole to really heat up the surrounding soil for a hour or so.  build up a good pile of hot coals inside many inches deep. 


While this is burning, prepare your recipe. I enjoy adding some butter and caramelizing sliced onions in the oven bottom.  Then browning the meat or stew pieces.  Adding in the whole potatoes, carrots, celery, garlic and a few cups of stock or broth.  I will typically chop and prepare these supplies at home in Tupperware containers to make the work a little easier and cleaner in the camp.  Sometimes I don't.  I also like to use my own bone broth to the dutch as it enhances the flavor.  You want enough liquid that things will not dry out like you would with a slow cooker.  


When it is ready to cook, simply shovel out half of the coals from the hole and place your lidded dutch into it, filling the spaces on top and around with the removed coals.  Then completely bury it with the soil from the hole.  

Now you can douse your fire and resume hunting without worry.  I'm usually out hunting by 2 or 2:30 and back after dark. All that is needed upon your return to camp is to dig up dinner!


Brush off the lid and enjoy!


If nobody lights a bonfire above your cooking hole your dinner should be ready-made,  hot, and tender. 


Tuesday, June 7, 2022

Venison Bone Broth Recipe

Recently there has been an explosion of interest in the health benefits of bone broth.  The prices in the grocery store reflect this newfound interest and demand, as well as new specialty brands that offer small containers of the product at exorbitant prices. 

The rumor is this healthy broth has many benefits to joints, bones, digestive, and overall health.  This wholesome and nutritious food has been consumed since prehistoric times.  The broth is loaded with vitamins and nutrients that support bone and joint health including things that modern health nuts purchase as a dietary supplement such as glucosamine and collagen.  The gelatin and amino acid content has been reported to aid and even heal your digestive tract by its affinity for water in the gut. Other amino acids found in bone broth, including glycine and arginine, have strong anti-inflammatory effect.  In addition,  glycine, may help you relax and sleep better.  The bottom line is bone broth is extremely healthy and low in calories.

You can make delicious and healthful bone broth right at home.  Since I am an avid outdoor sportsman, this was just another way to utilize my deer.  Venison bone broth is quite delicious, free range, wild-caught, antibiotic and hormone free! 

As I butcher my own deer it is quite easy to save the long bones and joints for broth making.  I can process a deer quicker now that I am not as fastidious about removing all the meat from the bones for the burger pile.  In fact, you want to leave lots of small bits of meat and cartilage on the bones for flavor!

I use a hatchet (or tomahawk) against some scrap plywood to break up the long bones for the purpose of exposing the marrow to flavor the broth, and also to better fit the bones in the pot for cooking.  As I butcher, I will place the broken bones in a large 2.5 gallon ziplock bag I will store in the refrigerator or freezer until it is time to make broth.  This is some of the deer carcass that is commonly discarded and you can put them to good use with minimal extra effort.  Do not use the skull or spinal column. 


When I am ready I will simply place the bones, on a cookie sheet in a preheated oven at 325 degrees for 2 hours.  The bones should get a nice brown color.  


I then remove the bones and place them in a large stock pot with lid.  Into the pot goes half a chopped onion, a cup or two of carrots, a few cloves of garlic, salt, pepper, a bay leaf or two and sometimes some celery.  Cover the bones with water and bring to a boil.  Reduce the heat to simmer and then get ready for a long slow cook for about 12 hours.  I typically turn the stove down to low so it is a slow simmer with the lid on and let it go overnight. 

After the simmer is done, strain out the broth into a new pot, cover with plastic wrap. and place the entire pot in the refrigerator until the fat layer solidifies.  Once very cold, skim off the white fat later with a skimmer or ladle, and you are left with a pot of jellied broth. 


Bring the pot to boil again while you prepare your pressure canner and jars.  Then ladle the hot broth into mason jars to can.  I will typically can these in quart or pint jars in my pressure canner for 20 minutes at 11 pounds pressure and they will last for a few years on the shelf. However, it rarely lasts that long!  One deer in this way will make about 6 quarts of venison bone broth.


It is rich and delicious and I often keep a quart jar in the refrigerator and heat up a cup when I am cold and need a pick-me-up.  It is also an easy way to add lots of flavor to stews and soups.  I really like to use some canned stew meat, add some bone broth, and thicken it into a nice gravy with corn starch to pour over noodles or rice.  


 Equipment:

Hatchet or tomahawk

Cookie sheet(s)

Large lidded stock pot 

Pressure canner (optional)

Ingredients:

1 deer's worth of leg and scapula bones and rib racks

Half onion

2 cups carrots

4 cloves of garlic

1/2 tbsp Salt

1/4 tbsp Pepper

1 or 2 whole Bay leaf

3 sticks of celery chopped


Monday, June 6, 2022

Making Fully Painted Wood Arrows

I will describe some techniques I currently use to craft fully painted wooden arrows.


To straighten I typically roll the shaft as described in this video, but I use a little heat gun and the palm of my hand to bend instead of the roller.  I feel that crushing the wood fibers is not the best.

https://www.youtube.com/watch?v=-hv8mauTlhY

After straightening with a little heat gun work, I will nock taper each shaft.

Then, because grain and proper nock orientation will be difficult to determine once the shafts are full painted, I mark a line on the taper where I want the indexer of the nock to be.  This part will not get painted. 

Grain orientation is important.


Then, I can screw on a standard large sized electrical connection wire nut that I screwed a small hook into, right onto the taper.  This does not deform the taper and holds the arrow tight. 


This hook can now be used to suspend the arrow shaft from a line or nail while drying.

The clothespins here are just to maintain separation on the line.  I used to use them to clamp onto the wire nut before I used the hooks.


Here you can see my dip tube setup and the old arrow box I have there to catch the drips after dipping.


If I want to point or tail taper I do this by hand with some 60 or 80 grit sandpaper.  I use a hole gauge when the shaft gets to the proper diameter.  I'll typically put about a 10 inch taper on the tail and 6 or so inches on the point end.  I currently have a stock of 23/64th POC and I barrel taper them this way.  If they are 11/32nd to start with I'll just tail taper down to 5/16th. 

I don't sand to a super smooth wood surface before painting.  The oil based will fill in small sanding marks and the finished product will still be smooth with good paint adhesion.

The paint I use is oil-based rustoleum in the can available at most big box hardware stores. I prefer gloss colors with a white base under bright colors.   The paint is a sealer.  If all wood is covered the paint acts as a sealer so I can skip the sealing step.   I get good adhesion from Duco cement on the paint over unfinished wood.  Duco is getting harder to find, and more expensive, but still worth the trouble in my opinion.

You can also brush on the un-thinned rustoleum paint with a foam brush with pretty good results.  I did this for years.  The oil-based paint will spread out and hide most brush lines if you are slow and careful.  Dipping thinned paint wastes more paint, but seems to be quicker and smoother.

I dip with 3 coats of paint thinned with paint thinner to a whole milk type consistency, sanding between the dried coats with 0000 steel wool.  Pour the thinned paint from the dip tube back into a mason jar while the shafts dry.  I can put on a coat of 6 shafts in about 10 minutes.

Unscrew the wire nut and glue on the nock using the index line you made earlier.

Then comes the burning with the Young feather burner.


The painted shafts are ready to hunt.


Tuesday, May 10, 2022

L.C. Smith - Hunting the Family Shotguns (Pheasants)


Hunting the Family Shotguns (originally published in the The Journal of the L.C. Smith Collectors Association - Volume 20, Issue 1, Spring 2022).


I am fortunate to have inherited two old L.C. Smith shotguns from my father.  The earliest gun belonged to my great grandfather Dr. David Marshall Ragan who was born in Conowingo, Maryland in 1866.  Doc Ragan began his practice in the horse and buggy days and served the good people of Cecil county, Maryland as a traveling country doctor.  He treated ill patients and delivered babies in their homes, sometimes receiving livestock as payment as referenced in his written receipts.  Eventually, he opened a pharmacy with his brother William and stayed in practice until the completion of the Conowingo Dam which forced him to abandon the building to the reservoir waters.   My father told me he was an avid bird hunter, and having the means, purchased a modest No. 2 Grade 16 gauge L.C. Smith SN 61359 that I now own.  The double has 28-inch barrels, shell extractors, two triggers, and a splinter forend that was finished on October 9, 1903.  It has engravings of a “woodcock in a circle” on the right side and a “Quail in a circle” on the left.  It has seen much use and handling but is still in fine shape for the age.


Combination Post office and Pharmacy.


Doc Marshall's doctor bag


Serial number 61359, 28-inch barrels, shell extractors, two triggers, splinter forend, Finished October 9, 1903. 1 of 191 built to those specifications. 


The second shotgun belonged to one of the doctor’s 6 sons, and my grandfather W. Curtis Ragan.  Curtis was a simple farmer who lived in the same town.  Having to scrape a living during the great depression my father told me he was often tasked with hunting as a means to bring home needed food for the family.  My grandfather liked to hunt squirrel and waterfowl.  His shotgun was the least expensive popular 12-gauge Field Grade SN 181176 with 30-inch barrels, two triggers and a splinter forend. It was built on November 28, 1935 on a regular-weight frame with automatic ejectors.   

 The Smith Won Grandfather's Pattern Test

The story is my grandfather set up a pattern test between his LC Smith and the Ithica featherweight pump he used mostly for duck hunting.  The Smith with the full choke barrel outperformed the Ithica and became his favored squirrel gun.  It is in excellent shape with only the bluing worn on the sides of each tube from carrying.


Serial Number 181176, Regular-weight frame, 30-inch barrels, two triggers, automatic ejectors, splinter forend, Finished April 28, 1939, 1 of 1,998 in that configuration.

A good friend of mine named Bill offered for me to join him on a pheasant hunt at a game club he was a member of in Gettysburg, Pennsylvania in early November 2020.  I quickly took him up on the offer and started thinking about using one of my vintage LC Smith shotguns on the hunt.  I decided I would use the later Field Grade shotgun of my grandfather as I had a couple boxes of vintage paper Remington “Kleanbore” number 6 shot shells that came with the gun.  That gun was also very tight and appeared to be in great shape.  I admit I struggled to hit the first couple birds, but I managed to kill a cock and a hen with it. 


When Bill asked again if I would join him on a hunt that year, I opted for my father’s more modern Italian over under 12 gauge instead, and I found it much easier to point than the long-barreled Field Grade.  As I was reflecting on the successful hunts with both my father and grandfather’s shotguns, I now had a desire to also use Doc Marshall’s 16 gauge and complete the use of the three generations of family shotguns.  I knew however that the 16 gauge needed a little more gentleness and was also chambered in 2 ½ inch instead of 2 ¾.   The stock was in great shape and I wanted to keep it that way. The pandemic was in full force by this point and ammo was now much harder to find.  Eventually, I was able to order some cardboard RTS number 7 shot in 2 ½ inch and was in business. 


As we signed in at the club house on that chilly morning in November 2021, I was brimming with excitement and a bit anxious about hunting with a gun that was 118 years old.  As we started out, I noticed immediately that the gun was a joy to carry.  Light weight compared to the 12-gauge Field Grade it pointed like a dream with the shorter 28-inch barrels.   As the dogs took to the sorghum field edges, I didn’t have long to wait for Bill’s Pudel pointer “Boomer” to have a bird on point.  Bill and I got up on that bird and it flushed beautifully rising against the smokey sky.  I was automatically on target and swinging with the bird from right to left.  Squeezing the front trigger, the bird instantly folded in a puff of feathers and Bill gave out a hearty “HEY YEAH” as Boomer went to work retrieving.   I had a huge smile and within an hour and a half, Bill and I both had our three-bird limit.  The elegant and trim little 16-gauge from bygone days handled like a dream and provided a day that will be a cherished memory. 


I’ll definitely be toting the old No. 2 Grade again if I go on future pheasant or dove hunts.  I’m thinking that the 30 inch 12-gauge Smith just might be the ticket for a spring gobbler hunt.  I had now accomplished successful hunts with 3 generations of the Ragan family shotguns.  The old girls can certainly still “get it done”.  I can’t help reflecting that one day when I am gone my son Garrett, who is now eight-year-old, may want to repeat the feat with the addition of my “vintage” Remington 870 12-gauge pump.  What better way to preserve a bit of history and remember our passed family members doing what they loved?


The author with Bill and Boomer at the end of a successful morning.


Friday, March 4, 2022

Sourdough English Muffins


Almost every morning I wake up for work I make myself a egg and cheese muffin for breakfast.  I used to buy a lot of Thomas' brand from the grocery store especially since the bakery is right in town where I live.  I found some great satisfaction in making these muffins myself at home and it is surprisingly easy. Since I have been sourdough obsessed, I already had the starter ready and fed.  I make a batch typically on the weekend and freeze what I will not use during the week.  The added benefit from making them myself is simple ingredients (really just flour, water, milk, salt, and sugar or honey) and no preservatives, additives, or soy.

To learn about making the starter check out my Sourdough Starter Post.

This is my recipe for making English muffins. 

Ingredients;

1 cup fed sourdough starter

4 cups all purpose flour

1/4 cup powdered milk (or regular milk just reducing water)

About 3/4 - 1 cup water

tablespoon or honey or sugar

1 teaspoon salt

some yellow cornmeal for sprinkling


In a large mixing bowl add 1 cup of sourdough starter.  Then I like to use 1/4 cup of dry powdered milk, but you could also use 1 cup of regular milk and reduce the added water. 


Next, add about a tablespoon of honey (or granulated sugar), 4 cups of all purpose flour, and about 3/4 cup of warm water.  


Mix with a sturdy wooden spoon until the mixture start to become tacky, then wet your hands well and turn it onto a floured surface and knead the dough until it is smooth and just slightly tacky adding more water if necessary.


Now there is just some time to wait.  Place the dough ball into a bowl and cover with a damp tea towel or I like to use my corningware dish that has a plastic lid to seal. 


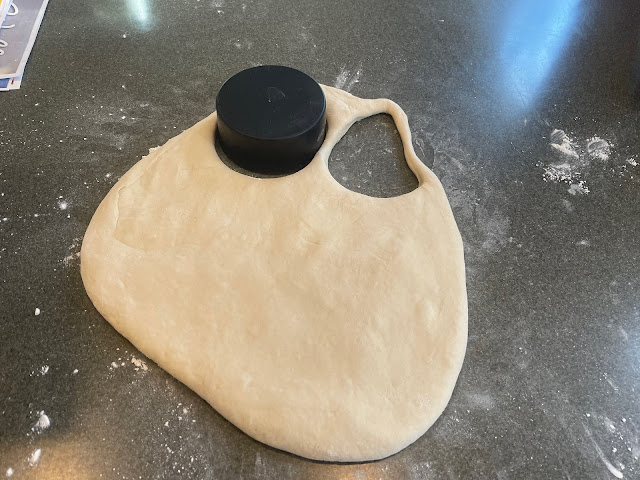
 After 8 -10 hours (or shorter if it is warm in the kitchen) turn the dough out onto a floured surface andpress it out using your hands or a floured rolling pin until it is about 1" in thickness   Using a 3" biscuit cutter, cut rounds and place them on a parchment lined baking sheet that's been sprinkled with cornmeal.  


 Sprinkle the tops with cornmeal, cover with a tea towel and allow to rise for 1 hour at room temperature. 

 
 Preheat your lidded iron skillet over LOW heat and let it fully heat up the lid and pan. No oil is needed, sprinkle corn meal over the pan and place muffins into the skillet spaced 2" apart, cover and cook the first side for about 4 minutes.  

 
Sprinkle additional corn meal over the tops and turn the muffins over and cook for an additional 4 minutes with the lid on. It helps to press down with a spatula lightly to eliminate the dome and get an even brown. 

 
 When done, the center of a muffin should register about 200°F on an instant-read thermometer.  Cool on a wire rack and your done. You can then freeze them in freezer bags or keep at room temps for a week.


Split them with a fork for maximum "nooks and crannies" before toasting.