Search This Blog

Wednesday, June 8, 2022

Burying the Dutch Oven - A Bowhunting Camp Tradition

There is nothing like coming back to deer camp after dark in the evening, tired and haggard from a long day of hunting, and not having to worry about cooking a hot meal.  The dutch oven is a primitive version of crock pot cooking with the benefits that everything is sealed and safe. It is a delicious food time capsule delivering a piping hot cooked meal on demand. 

I stumbled across this method of camp cooking when I was reading some of John Schulz's stories about the legendary Howard Hill.  Apparently, some fans heard Howard was camped in a certain area and made themselves at home in his camp waiting for his return.  They decided to help him out by building a roaring fire.  The problem was that Howard had a nice venison roast buried under the campfire in his dutch oven.  When he saw the fire as he approached camp, he ran out like a wild-man to the shock of his "guests" cursing and kicking burning logs all over the place trying to rescue his supper.  He was too late and it was a charcoal softball.  He was not too happy with those particular "fans" after he had to eat cold peanut butter sandwiches for supper.  


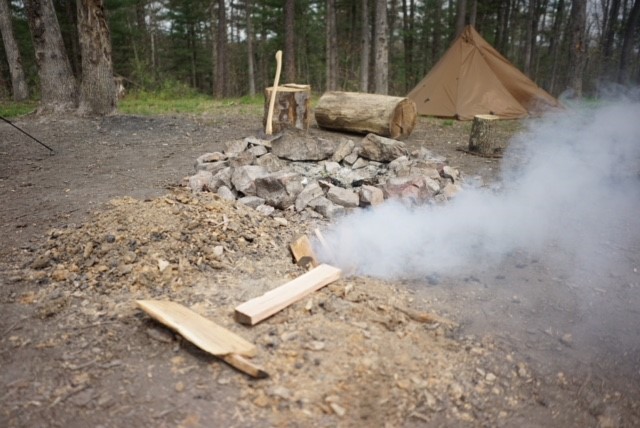
Burying the dutch has now become my traditional hunting camp supper because of the quality and convenience of the meal.  After a quick breakfast I am out and hunting in the magical morning hours.  I'll typically return about midday and start a campfire and begin preparations.  I will have already had my camp non-cooking camp mates dig a hole that is at least 3 inches wider and several feet deeper than the dimensions of the dutch oven adjacent to my campfire.   


Once there are some good coals going, shovel a bunch and fill the hole. Then continue to burn some more wood in the hole to really heat up the surrounding soil for a hour or so.  build up a good pile of hot coals inside many inches deep. 


While this is burning, prepare your recipe. I enjoy adding some butter and caramelizing sliced onions in the oven bottom.  Then browning the meat or stew pieces.  Adding in the whole potatoes, carrots, celery, garlic and a few cups of stock or broth.  I will typically chop and prepare these supplies at home in Tupperware containers to make the work a little easier and cleaner in the camp.  Sometimes I don't.  I also like to use my own bone broth to the dutch as it enhances the flavor.  You want enough liquid that things will not dry out like you would with a slow cooker.  


When it is ready to cook, simply shovel out half of the coals from the hole and place your lidded dutch into it, filling the spaces on top and around with the removed coals.  Then completely bury it with the soil from the hole.  

Now you can douse your fire and resume hunting without worry.  I'm usually out hunting by 2 or 2:30 and back after dark. All that is needed upon your return to camp is to dig up dinner!


Brush off the lid and enjoy!


If nobody lights a bonfire above your cooking hole your dinner should be ready-made,  hot, and tender. 


Tuesday, June 7, 2022

Venison Bone Broth Recipe

Recently there has been an explosion of interest in the health benefits of bone broth.  The prices in the grocery store reflect this newfound interest and demand, as well as new specialty brands that offer small containers of the product at exorbitant prices. 

The rumor is this healthy broth has many benefits to joints, bones, digestive, and overall health.  This wholesome and nutritious food has been consumed since prehistoric times.  The broth is loaded with vitamins and nutrients that support bone and joint health including things that modern health nuts purchase as a dietary supplement such as glucosamine and collagen.  The gelatin and amino acid content has been reported to aid and even heal your digestive tract by its affinity for water in the gut. Other amino acids found in bone broth, including glycine and arginine, have strong anti-inflammatory effect.  In addition,  glycine, may help you relax and sleep better.  The bottom line is bone broth is extremely healthy and low in calories.

You can make delicious and healthful bone broth right at home.  Since I am an avid outdoor sportsman, this was just another way to utilize my deer.  Venison bone broth is quite delicious, free range, wild-caught, antibiotic and hormone free! 

As I butcher my own deer it is quite easy to save the long bones and joints for broth making.  I can process a deer quicker now that I am not as fastidious about removing all the meat from the bones for the burger pile.  In fact, you want to leave lots of small bits of meat and cartilage on the bones for flavor!

I use a hatchet (or tomahawk) against some scrap plywood to break up the long bones for the purpose of exposing the marrow to flavor the broth, and also to better fit the bones in the pot for cooking.  As I butcher, I will place the broken bones in a large 2.5 gallon ziplock bag I will store in the refrigerator or freezer until it is time to make broth.  This is some of the deer carcass that is commonly discarded and you can put them to good use with minimal extra effort.  Do not use the skull or spinal column. 


When I am ready I will simply place the bones, on a cookie sheet in a preheated oven at 325 degrees for 2 hours.  The bones should get a nice brown color.  


I then remove the bones and place them in a large stock pot with lid.  Into the pot goes half a chopped onion, a cup or two of carrots, a few cloves of garlic, salt, pepper, a bay leaf or two and sometimes some celery.  Cover the bones with water and bring to a boil.  Reduce the heat to simmer and then get ready for a long slow cook for about 12 hours.  I typically turn the stove down to low so it is a slow simmer with the lid on and let it go overnight. 

After the simmer is done, strain out the broth into a new pot, cover with plastic wrap. and place the entire pot in the refrigerator until the fat layer solidifies.  Once very cold, skim off the white fat later with a skimmer or ladle, and you are left with a pot of jellied broth. 


Bring the pot to boil again while you prepare your pressure canner and jars.  Then ladle the hot broth into mason jars to can.  I will typically can these in quart or pint jars in my pressure canner for 20 minutes at 11 pounds pressure and they will last for a few years on the shelf. However, it rarely lasts that long!  One deer in this way will make about 6 quarts of venison bone broth.


It is rich and delicious and I often keep a quart jar in the refrigerator and heat up a cup when I am cold and need a pick-me-up.  It is also an easy way to add lots of flavor to stews and soups.  I really like to use some canned stew meat, add some bone broth, and thicken it into a nice gravy with corn starch to pour over noodles or rice.  


 Equipment:

Hatchet or tomahawk

Cookie sheet(s)

Large lidded stock pot 

Pressure canner (optional)

Ingredients:

1 deer's worth of leg and scapula bones and rib racks

Half onion

2 cups carrots

4 cloves of garlic

1/2 tbsp Salt

1/4 tbsp Pepper

1 or 2 whole Bay leaf

3 sticks of celery chopped


Monday, June 6, 2022

Making Fully Painted Wood Arrows

I will describe some techniques I currently use to craft fully painted wooden arrows.


To straighten I typically roll the shaft as described in this video, but I use a little heat gun and the palm of my hand to bend instead of the roller.  I feel that crushing the wood fibers is not the best.

https://www.youtube.com/watch?v=-hv8mauTlhY

After straightening with a little heat gun work, I will nock taper each shaft.

Then, because grain and proper nock orientation will be difficult to determine once the shafts are full painted, I mark a line on the taper where I want the indexer of the nock to be.  This part will not get painted. 

Grain orientation is important.


Then, I can screw on a standard large sized electrical connection wire nut that I screwed a small hook into, right onto the taper.  This does not deform the taper and holds the arrow tight. 


This hook can now be used to suspend the arrow shaft from a line or nail while drying.

The clothespins here are just to maintain separation on the line.  I used to use them to clamp onto the wire nut before I used the hooks.


Here you can see my dip tube setup and the old arrow box I have there to catch the drips after dipping.


If I want to point or tail taper I do this by hand with some 60 or 80 grit sandpaper.  I use a hole gauge when the shaft gets to the proper diameter.  I'll typically put about a 10 inch taper on the tail and 6 or so inches on the point end.  I currently have a stock of 23/64th POC and I barrel taper them this way.  If they are 11/32nd to start with I'll just tail taper down to 5/16th. 

I don't sand to a super smooth wood surface before painting.  The oil based will fill in small sanding marks and the finished product will still be smooth with good paint adhesion.

The paint I use is oil-based rustoleum in the can available at most big box hardware stores. I prefer gloss colors with a white base under bright colors.   The paint is a sealer.  If all wood is covered the paint acts as a sealer so I can skip the sealing step.   I get good adhesion from Duco cement on the paint over unfinished wood.  Duco is getting harder to find, and more expensive, but still worth the trouble in my opinion.

You can also brush on the un-thinned rustoleum paint with a foam brush with pretty good results.  I did this for years.  The oil-based paint will spread out and hide most brush lines if you are slow and careful.  Dipping thinned paint wastes more paint, but seems to be quicker and smoother.

I dip with 3 coats of paint thinned with paint thinner to a whole milk type consistency, sanding between the dried coats with 0000 steel wool.  Pour the thinned paint from the dip tube back into a mason jar while the shafts dry.  I can put on a coat of 6 shafts in about 10 minutes.

Unscrew the wire nut and glue on the nock using the index line you made earlier.

Then comes the burning with the Young feather burner.


The painted shafts are ready to hunt.